How to SSH into a Circle CI Build Container
⏳ 4 min read
 source: https://circleci.com/docs/2.0/about-circleci/INTRODUCTION
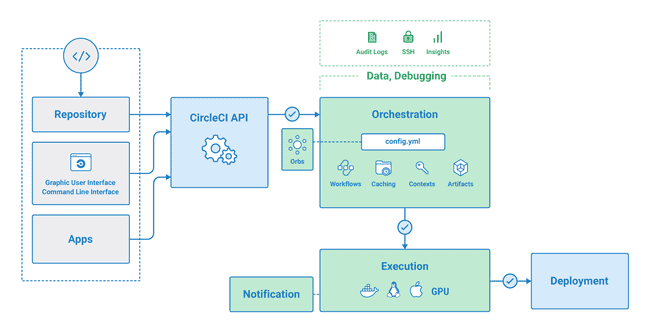
During the process of continuous integration and continuous deployment on a circleci server, a container of machine image (linux, mac, windows, etc) is spun up to work as your local development environment. Within the container, your application codebase runs in a pipeline wherein app dependencies could be installed, tests, build, and deployment stage, etc could also run.
A pipeline is a series of stages or processes used for automating the build, test, and deployment of applications. The processes/stages are connected such that the output from a preceding stage can be used as input to run the next stage(s).
WHY YOU MAY NEED TO SSH INTO YOUR CIRCLECI BUILD CONTAINER
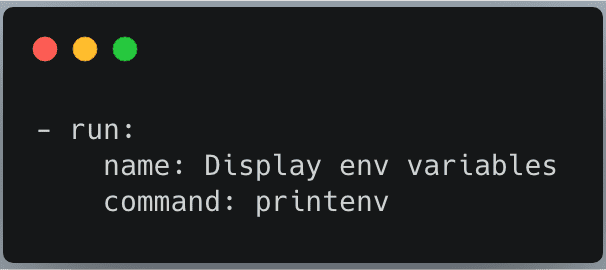
- You need to access the values of your environment variables: Although this can be achieved by adding a command that runs "printenv" inside a stage in the circleci config.
 sample command in a circleci .config file
- This is not a good practice in DevOps as it exposes your environment variables to anyone that has access to the project repository. So, you should rather SSH into the build container to print the variables.
- You need to verify whether certain packages were installed in your pipeline.
- You need to check the path where certain files exist.
- You need to troubleshoot and run commands as you would from your local computer.
- You need to check resources allocation within the container.
If you're using a Linux image in your pipeline, you can use the following to check for Memory and CPU allocation respectively.
$ cat /proc/meminfo
$ cat /proc/cpuinfo
CREATING AN SSH KEY
Before you can SSH into a circleci build container, you have to create an SSH key and add it to your GitHub repository. Below are the steps to get this done:
Open your local terminal and check if you already have an SSH key by running this command
$ cat ~/.ssh/id_rsa.pubIf you don't have an SSH key already, then run the following command to create one. Substitute the arbitrary email with your GitHub email address.
$ ssh-keygen -t rsa -b 4096 -C email@domain.comWhen prompted for a password and filename to save the SSH key, you can leave them blank and press enter key to continue. This will generate a file like this:
/Users/{your_computer_name}/.ssh/id_rsaSo id_rsa file will contain your key by default.
Now that you have a key, you need an agent to act for you. First, check if ssh agent is already running by checking whether the environmental variable SSH_AUTH_SOCK is defined.
$ echo $SSH_AUTH_SOCKIf not, start the SSH agent in the background with this command
$ eval "$(ssh-agent -s)"Use the command below to add the SSH private key to your ssh-agent and store your passphrase in the keychain (your passphrase can be recovered from keychain in case you created the SSH key with passphrase and had forgotten it).
$ ssh-add -K ~/.ssh/id_rsaUse the command below to copy the SSH key to your clipboard. You can also copy the content of the file by yourself after you cat the file.
$ pbcopy < ~/.ssh/id_rsa.pubOR
$ cat ~/.ssh/id_rsa.pub | pbcopyIn case you supplied a filename while creating the SSH key, then ensure you're copying the file rather than what is specified above. Paste the SSH key into your GitHub account:
- Go to settings on your GitHub account
- Click on SSH and GPG keys option
- On the resulting page, click on New SSH key and paste in the key you had copied from your terminal.
RUN CIRCLECI PIPELINE WITH SSH
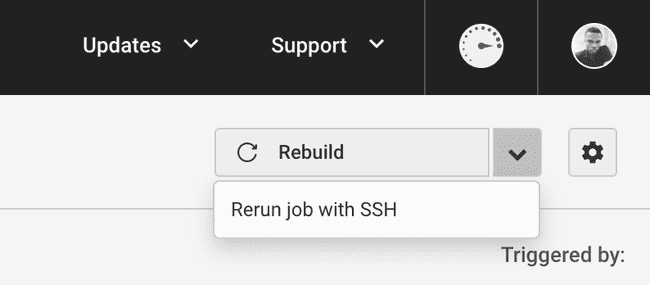
Go to the CircleCI account that you want to SSH into and run the job with SSH. The option should be located at the top-right conner of your screen. Use the screenshot below as a guide:

This will introduce a layer labelled Enable SSH in the circleci job. To see the connection details, expand the Enable SSH layer and copy the much needed connection command.
$ ssh -p <PORT> <IP ADDRESS>

Run the SSH connection command in your local terminal, and proceed with the purpose for SSHing into the circleci container.
To exit from the container, run exit command in your terminal.
$ exit📅 23-01-2020